Showing posts with label canning. Show all posts

Sunday, July 22, 2012

Riffling Through—and Interpreting—Old “Mango” Recipes

Because we got so many varicolored peppers in this week’s share, my mom called me looking for an old recipe for relish made from mangoes—an old name for sweet peppers—that she had given me. It took a little while, but I found it typed on its original 3 x 5 index card, probably from the 1960s. I sent it to her, and then decided I’d put it on the blog, too. It’s quite succinct, but I’ll warn you—a fifty-year-old recipe needs a little interpretation, which follows. Also, I’ve halved the recipe (it originally called for two dozen “mangoes”) but you can easily double this if the peppers keep coming.

Uphouse[1] Mango[2] Relish

1 dozen red and green MANGOES (soak in HOT water[3])
8 lg. onions[4]
3/4 cup sugar
1 Tbsp. salt
1/2 Tbsp. white mustard seed
1/2 Tbsp. celery seed
1 cup white vinegar

Put all peppers thru food chopper with a large knife[5] and cover with boiling water[6]. Let stand 10 minutes. Add onions and rest of ingredients. Cook 10 minutes and seal hot[7].

1. My grandparents’ neighbors were called the Uphouses, and as a kid I assumed it was because they lived in a house up at the top of my grandparents’ yard, but it turns out their name actually was “Uphouse.”
2. When I was a kid, we didn’t have green peppers; they were called mangoes. I’m told that no one around here ever ate tropical mangoes, but as green peppers turned orange and red, they looked a little like those tropical fruit, and so they got the name. I expect a few people still call them mangoes, but this mango relish uses green and red peppers. I’m sure you can substitute purple and white peppers as well.
3. I don’t know what this direction means. Do you soak them before you chop them, or after? I just don’t know.
4. My guess is you want to chop the onions, too.
5. A food chopper with a large knife—sounds like a proto-food processor, so I’m assuming you could chop them, pulsing before they turn to mush, or use a knife or some other chopping device.
6. How much boiling water? Hmmm. To cover. And it never says to drain the water. Do you? Or do you just throw in the sugar, salt, seeds, and vinegar on top of that water? Another mystery.
7. Seal hot is concise shorthand for a canning process—you want to put the hot mixture in sterilized jars, put on the lids and rings, and then put the jars in a boiling water bath. Since it has vinegar in the mixture, you don’t need to pressure can the relish, as it’s acidic. Probably best to leave it in the boiling water bath for 5 to 10 minutes. When you take the jars out, you should hear them click as the seal forms.

If you expect to eat the relish with a couple of weeks, you can probably safely put it in sterilized jars and refrigerate it without canning. And let me know if you figure out the hot water soak and whether or not to drain the boiling water. I’ll probably give it a try at some point, so if I figure it out I’ll post an addendum to this blog entry, too. One final note: As I recall, this relish is really delicious, well worth trying with our large "mango" harvest.

Thursday, July 19, 2012

Raw Panic

There was a great article in the NY Times yesterday about being inundated with raw vegetables, either because you went crazy at the farmer’s market, you have a garden that’s doing very well, or you belong to a CSA. I highly recommend reading the entire article, but if you don’t have time to do so because you are up to your ears in squash and tomatoes, here are some highlights—

First, try to deal with as much of the produce as you can the day you get it. Sometimes easier said than done, but I am happy to say I have learned this lesson in the last couple of CSA seasons. I do my best to clear Saturday afternoons in July, August, and September to blanch, pickle, freeze, and can. (That sounds like a song chorus, doesn’t it?) The NY Times article also suggests simply roasting the vegetables (each kind separately) with a little olive oil and salt in the oven, then cooling and refrigerating. This gives you a refrigerator full of cooked vegetables, which are easier to deal with during the upcoming work week. A good plan.

Not in the article, but my quick tip for the day, is “blanch and freeze.” This works great for green beans and tomatoes, but you can also use it for many other things (corn, eggplant, even some summer squashes). For tomatoes, put in boiling water for about 8 to 10 minutes, cool, peel/core, and freeze in freezer bags. For green beans, snap the ends off, cook for about a minute or two in boiling water, remove to a bowl filled with ice and water, drain, put in bags and freeze. This doesn’t take long, and you’ll have nearly fresh vegetables all winter long.

The article also says that greens should be washed before storing. I’m not sure I agree with that; I think lettuce, anyway, starts to wilt faster if it is washed and then stored. But the article does give a good tip for washing greens of all kinds: wash them in lots of water (that is, don’t stick them under the faucet, but fill the sink, douse the greens, swirl them around, and let the dirt sink). But soft herbs like basil shouldn’t be washed until just before they are used; the water will speed deterioration.

Vegetables and fruit should be stored separately, because the gas ethylene, which is produced by ripening fruit, can damage vegetables. Some produce will continue to ripen if left out on the counter, including apples, pears, and tomatoes. Others will not, including bell peppers and squash. They will only deteriorate if left out, so do refrigerate them.

Back to cooking—the article notes that though raw vegetables are definitely good for you, you can only eat so many of them. When you are eating all those good vegetables anyway, there is some justification in lavish applications of fat (bacon bits, butter, cheese, oil) to make those vegetables eminently palatable. Or, as Mike Flanders likes to refer to greens: “bacon delivery systems.”

A quick and easy way to add a little tasty fat to your vegetables is to sauté a little onion, garlic, or shallot in butter, turn the vegetables in the pan and move them around a bit until they start to soften. Then cover tightly and let them cook in their own steam, testing them often.

That’s it for the recap of the article; I do recommend reading the whole article online!

Tuesday, July 10, 2012

Top Ten Things to Do with a Surfeit of Tomatoes

We’re going to get a bumper crop of tomatoes in the next few weeks. How great is that? The only thing is, you’ll need to figure out some ways to keep some of them for later. Even the most ardent tomato fan, like me, can’t eat tomatoes morning, noon, and night. Here are a few suggestions to keep in mind when the tomatoes start rolling in; we’ll start posting recipes for some of these ideas soon, too!

10. Cook up a big batch of ketchup. How cool will it be to have homemade ketchup for your burgers and fries?
9. Experiment with exquisitely flavored spaghetti sauce and freeze it to enjoy the essence of summer in the middle of winter.
8. Chop them up for tomato chutney, relish, chop-chop, or whatever you call it, to can and keep or jar and keep for a long time in the fridge.
7. Use them for a facial. It's true; they are an astringent and can allegedly clear up acne, open pores, and generally help your skin.
6. Create a French country pizza—fresh dough topped with olive oil, sliced tomatoes, and mozzarella. Or bake them in a pie. A tart actually, but there are lots of recipes for tomato tarts out there.
5. Process a few jars of tomato jam (great with homemade ricotta on homemade bread).
4. Make sun-dried tomatoes. You can do it in the oven, and if they aren’t completely dry, they also keep marvelously packed in olive oil with garlic and spices. When you want to use them, drain them and toss with pasta; save the olive oil to make a delicious salad dressing, too.
3. Blanch, peel, and freeze them in freezer bags to make sauce or add to stews all winter.
2. Put together a gallon of gazpacho. It’s no-cook (except for skinning the tomatoes) and the perfect food for hot summer days.

And the number 1, most delicious way to enjoy homegrown Ohio Valley tomatoes—slice and eat them with a little salt and pepper or oil and vinegar—enjoy the bounty!

Look for more ideas and recipes coming soon . . . and if you have a favorite recipe to share, send it to the Enright CSA blog at farm@pricehill.org or to the Enright Greenhouse Gazette at hotchsdirt@gmail.com.

Tuesday, August 16, 2011

Pear Butter, Slow but Easy

There was a time when making jams, preserves, or fruit butters was a long, hot process. It still takes awhile, but it's not so hot, or hands-on, now that you can make these tasty spreads using a microwave, crockpot, or even a bread maker. (My bread maker has a "jam" setting, but I must admit I haven't tried it . . . yet.)

But with those nice pears we got recently, and the possibility of more to come from the Schenks' tree, I thought I'd post an easy pear butter recipe. This one comes in part from the cookbook that came with my old crockpot, but special thanks to Angie Utley for telling me that not only didn't I have to peel the pears, it actually thickens better with the peels!

You have to cook the fruit first; Angie does this right in the crockpot, though I've done it on the stove in the past, and now think the microwave method is just spiffy.

Pear Butter

Pears, cored and diced
Sugar--about 1/2 cup per cup of diced pears
Cinnamon--about 1 teaspoon per 3 cups of diced pears
Nutmeg--about 1/4 teaspoon per 3 cups of diced pears

After you've cored and diced the pears, you need to cook them until they soften. You can do it in the crockpot, or on the stove, but it will take a few hours in the crockpot and upwards of an hour on the stove, over low heat. Or you can put them all in a glass bowl and microwave them (I had about 12 cups of diced pears, and microwaved the fruit for 7 minutes, stirred, cooked for 7 more minutes, stirred, and then cooked for a final 6 minutes).

When the fruit is soft, put it in the crockpot with the sugar (for 12 cups of pears, I made "low-sugar" pear butter with just 5 cups of sugar). Add the spices (I used 4 teaspoons of cinnamon and 1 teaspoon of nutmeg), mix well, and cook on high for 10 to 12 hours. Leave the lid off the crockpot for the last three hours or so, and stir (and mash) the fruit occasionally during those last three hours.

You should have a nice thick brown "butter," similar to apple butter. Put it in sterilized jars and either refrigerate it if you'll eat it soon, or use canning lids and process in a hot water bath for ten minutes to keep jars of it for the winter.

Update: Angie Utley posted a link to her favorite fruit butter recipe on the Enright CSA Facebook page and I wanted to share it here, too: Fruit Butters/Food in Jars. It uses less sugar, and I think I will use less sugar next time, too.

Monday, July 18, 2011

Bread and Butter Pickles

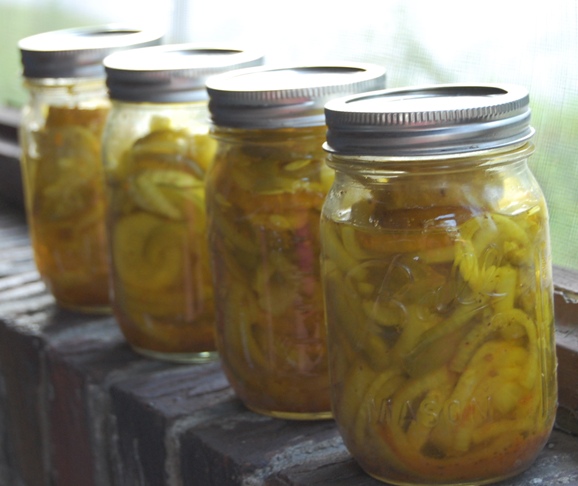
I've been preserving by some of the produce from the CSA this weekend by pickling. I'll report in a few days on my success with Asian cold pickling, but for now here is an old and easy recipe for bread and butter pickles. It requires canning jars, lids, and rings, but you just process them in an open hot water bath (that is, a big pot full of boiling water), so if you have a spaghetti pot, that and a few Mason or Ball jars is all you need in the way of "special equipment" for this canning project. And that's just if you want them to last for months. If you're making less (say half the recipe) and you plan to refrigerate it and eat the pickles in a couple of weeks, you don't even have to process them. Just pack them in a clean and sterile glass jar that used to have something else in it (pour almost boiling water in the glass jar and let it sit for 15 minutes or so to sterilize the clean jar). Bread and butter pickles turn an outlandish electric yellowy color (from the turmeric, which is also a preservative) that make them look like they are from outer space, or perhaps just radioactive, but they are really delicious.

Bread and Butter Pickles

1 qt sliced cucumbers
1 1/2 cups sliced white onions
1/2 cup sliced green peppers
1 clove garlic
1 1/2 tsp pickling or kosher (coarse) salt

1 1/4 cup sugar
3/4 cup distilled vinegar
1/2 tsp. turmeric
1/2 tsp. celery seeds
1/2 tsp. mustard seeds

Combine the cucumbers, onions, green peppers, and whole garlic clove in a glass pan or bowl. Add the salt and cover with crushed ice. Mix thoroughly. Let stand for three hours in the refrigerator, then drain well. Discard the garlic and put the rest of the vegetables in a large pan. Combine the remaining ingredients, pour over cucumber mixture, and bring to a boil. Fill hot jars with the vegetables and brine to 1/2" from the top of the jars, put on the lids and rings, and then process in boiling water bath for 5 minutes.