Thursday, August 4, 2011

Late for Lammas!

I missed Lammas this year. Well, I didn’t miss it, but I meant to post something about it on August 1 or 2, and now I’m a bit late. So this shall be a remembrance of Lammas, which is also known as Lughnasa, or in our modern world “the August bank holiday” in nations that were once part of the British empire, like Australia and Canada.

But what Lammas was and could be again is a First Fruits Festival—a celebration of the time when the harvest really gets rolling. Lughnasa is its Irish name, which comes from the Celtic sun god, Lugh. Lammas is actually the Christian name of the festival, from “Loaf-Mass,” because loaves of bread were baked from the first grain gleaned from the fields around this time.

In its pagan incarnation, it was a jolly Irish wake for Lugh, because the sun begins to get scarce again after the summer solstice. If you remember the old Traffic song “John Barleycorn Must Die,” there’s something of the same theme in it: the first of the grain is milled and baked into a loaf (or fermented and distilled into a cheering beverage). John Barleycorn dies so the people who depend on the grain can live through the winter.

So, it’s a holiday with some sad connotations, a time when we begin to say farewell to the warm growing season. But it’s not the end (that’s Samhain, or Hallowe’en, as we call it now) and there's still plenty of warmth and harvest left to come. In fact, it’s the perfect time to think about how to preserve all the goodness of summer fruits and vegetables for winter.

Let’s call it Lammas Week, time to start (if you haven't yet) pickling, canning, preserving, fermenting, blanching, freezing, and otherwise keeping John Barleycorn and his cousins, Tim Tomato and Gina Green Bean and Polly Pepper, all alive in our memories as well as in our freezers and pantries for many, many months to come.

Wednesday, August 3, 2011

Sandpoint Daily Bee Zucchini Pancakes

This recipe is courtesy of CSA member Travis Geurin, by way of the pages of a small town newspaper in Idaho around 1988. I haven’t had a chance to make these yet, but with the cool(er) weather behind the storm this morning, this might be the day.

Travis reports that he uses the rule of thumb of 2 cups of grated zucchini is equal to one medium zucchini, to figure how much you need for the recipe. He also says he usually doubles the recipe and use tablespoons instead of teaspoons when measuring the fresh herbs, because you can never have too many fresh herbs!

Makes 8 to 10 4" pancakes

2 medium zucchinis
2 eggs, lightly beaten
4 Tbsp all-purpose flour
2 tsps baking powder
¼ cup Parmesan cheese
1 tsp fresh chives
1 tsp fresh parsley
Dash of onion or garlic salt to taste

Grate the zucchini and let stand in a colander to drain, and/or squeeze out excess liquid--there’s more than you’d think. In a large bowl, sprinkle flour, baking powder, cheese, and herbs over shredded zucchini and mix well. Add beaten eggs, mix. (For a little thicker pancake, if the batter is runny, add a little flour.) Fry in butter on medium heat about 4 minutes per side, or until brown. Serve warm with butter and large slabs of fresh garden tomatoes and cottage cheese, sour cream, or yogurt. Now, that’s good local summer eating!

Sunday, July 31, 2011

Apples & Corn

The harvest on Saturday included apples and corn, both welcome. However, they weren't grown at the Enright CSA. We don't have any apple trees yet (but give us time); they were from an orchard in Bridgetown. And corn requires a lot of space, so maybe when we get some more growing space we can grown our own. But it's nice that we are able to support other local farms by buying some produce to add to the shares a few times a year.

I had some of the corn in a bean dip at a party at fellow CSA member Tina Michel's house on Saturday night, and I will admit to picking up the last kernels on my plate with my fingers when my tortilla chips were gone, it was so tasty. I noticed that another young CSA member enjoyed her corn straight from the cob. (Thanks for sharing that photo, Michael Frazier!) I had an apple for breakfast this morning, and it was great, too, crisp and sharply sweet.

It was altogether a beautiful share this week, with the first of the peppers (the purple peppers are almost too pretty to eat--almost), a tomato, and even an eggplant on the share table. I think it's been our most colorful share so far, and it made a feast for the eyes, set out for pickup (good job, team) even before we all took it home to cook up a few feasts for the table.


Friday, July 29, 2011

Do Chua: Asian Pickling, Part II

There’s a new Vietnamese restaurant down at Findlay Market that sells Bahn Mi (a French-Asian baguette sandwich), and one of the garnishes they use is a carrot and daikon radish pickle called Do Chua. Turns out it’s really easy to make at home, especially if you have a lot of daikon radishes from your CSA share.

This recipe makes about two cups of pickle (fits nicely into an applesauce jar). You can make more or less, but there should be more daikon than radish—the suggested ratio is 2:1. You need about 3 carrots and 6 to 8 daikon radishes, no more than 2 inches in diameter. The classic way is to peel them and cut them into matchsticks, but I'm here to tell you, it’s a pain in the neck to cut round things into matchsticks. Some recipes call for grating or shredding the peeled carrots and radishes, maybe even using a food processor, and I might try that next time.

After you make those nice little matchsticks, the next step is to put them in a bowl and sprinkle them with 1 teaspoon of salt and 2 teaspoons of sugar. Use your hands to knead the vegetables for about 3 minutes. This expels a lot of the water from the vegetables, and as they soften you’ll see a pool of liquid forming at the bottom of the bowl. You can stop kneading when you can bend a piece of daikon so that the ends touch but it doesn’t break. Then drain them in a colander and rinse under cold running water. Press out the extra water so the vegetables are as dry as possible, then pack them in a clean jar.

To make the brine, put about 1/2 cup warm water in a big 2-cup measuring cup or some other container with a pouring spout. Add 3/4 cup distilled white vinegar (or rice vinegar) and 3/8 cup sugar, then stir to dissolve the sugar. Pour the brine over the vegetables to cover. Let the vegetables marinate in the brine for at least 1 hour before eating. They will keep in the refrigerator for up to 4 weeks.


Wednesday, July 27, 2011

It's Kimchi, Not Land Mines: Asian Cold Pickling I

When I told my friend Barb, also a CSA member, that I had made kimchi (Korean sauerkraut, more or less), she reminded me that there was an episode of M*A*S*H in which the 4077th thought the locals were placing land mines around the hospital camp, but in fact they were burying jars of kimchi. Well, I decided for safety's sake I wouldn't bury my kimchi; I stored in the refrigerator. Turns out that in Korea, there are kimchi refrigerators now, just for storing this stuff. I think it's the national food.

I made my kimchi when the Chinese cabbage was coming in fast and furious a couple of weeks ago, and we finally got around to eating some tonight (it has to ferment). WOWSER! This is some hot stuff. It's pretty tasty, too; it reminded me of calamari, weirdly enough, but much, much hotter than any octopus I ever ate. It keeps for weeks, so you might see some at the next potluck. Take tiny bites!! If you want to try this at home, here's the recipe I used. (I found the fish sauce and chili paste in the Asian section of the local Bigg's store.)

Korean Kimchi

1 large Chinese cabbage
1 gallon water
1/2 cup coarse salt
1 small head of garlic, peeled and finely minced
2-inch piece of fresh ginger, peeled and minced
1/4 cup fish sauce
1/3 cup chili paste
1 bunch green onions, cut into 1-inch lengths, including the green part
1 medium daikon radish, peeled and grated
1 teaspoon sugar or honey

Slice the cabbage lengthwise in half, then slice each half lengthwise into 3 strips. Cut away as much of the tough stems as you can. Then dissolve the salt in the water in a very large container and submerge the cabbage under the water. Put a plate (or a pot of water, which is what I used) on top to make sure they stay under water and let stand for 2 hours.
Mix the other ingredients in a very large metal or glass bowl. Drain the cabbage, rinse it, and squeeze it dry. Now mix it all up. You might want to wear rubber gloves if you use your hands, but a really large spoon works, too. Pack the kimchi in a clean glass jar large enough to hold it all and cover it tightly. Let stand for one to two days in a cool place, around room temperature. Check the kimchi after 1-2 days. If it’s bubbling a bit, it’s ready and should be refrigerated. If not, let it stand another day, when it should be ready. Once it’s fermenting, serve or store in the refrigerator. Eat the kimchi within 3 or 4 weeks, or it can get too fermented. Unless you bury it in the backyard, I guess . . .

Thursday, July 21, 2011

A Gift from the Compost Pile

As if you need another reason to compost, besides keeping stuff out of the landfill (or in the sewer system if you have a garbage disposal) and creating nice, nutrient-rich soil to grow more good stuff, how about these apples? I mean, squash!

Mike found this big, ripe acorn squash in our compost pile this morning. I've seen volunteer tomatoes in compost before, but this is the first gift squash I've encountered. We're going to enjoy eating it roasted with a little butter and salt and pepper. And we didn't have to do a thing to get it, except throw the kitchen scraps (including the seeds from an acorn squash last year, obviously), onto the compost pile back on the old overgrown patio. Free food! What could be better . . .

Monday, July 18, 2011

Bread and Butter Pickles

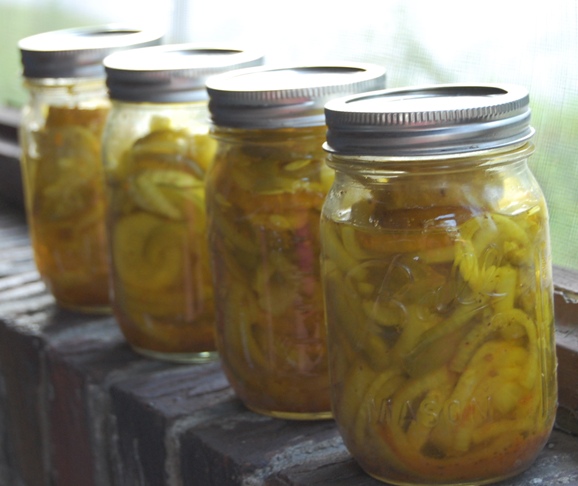
I've been preserving by some of the produce from the CSA this weekend by pickling. I'll report in a few days on my success with Asian cold pickling, but for now here is an old and easy recipe for bread and butter pickles. It requires canning jars, lids, and rings, but you just process them in an open hot water bath (that is, a big pot full of boiling water), so if you have a spaghetti pot, that and a few Mason or Ball jars is all you need in the way of "special equipment" for this canning project. And that's just if you want them to last for months. If you're making less (say half the recipe) and you plan to refrigerate it and eat the pickles in a couple of weeks, you don't even have to process them. Just pack them in a clean and sterile glass jar that used to have something else in it (pour almost boiling water in the glass jar and let it sit for 15 minutes or so to sterilize the clean jar). Bread and butter pickles turn an outlandish electric yellowy color (from the turmeric, which is also a preservative) that make them look like they are from outer space, or perhaps just radioactive, but they are really delicious.

Bread and Butter Pickles

1 qt sliced cucumbers
1 1/2 cups sliced white onions
1/2 cup sliced green peppers
1 clove garlic
1 1/2 tsp pickling or kosher (coarse) salt

1 1/4 cup sugar
3/4 cup distilled vinegar
1/2 tsp. turmeric
1/2 tsp. celery seeds
1/2 tsp. mustard seeds

Combine the cucumbers, onions, green peppers, and whole garlic clove in a glass pan or bowl. Add the salt and cover with crushed ice. Mix thoroughly. Let stand for three hours in the refrigerator, then drain well. Discard the garlic and put the rest of the vegetables in a large pan. Combine the remaining ingredients, pour over cucumber mixture, and bring to a boil. Fill hot jars with the vegetables and brine to 1/2" from the top of the jars, put on the lids and rings, and then process in boiling water bath for 5 minutes.